Projects
Unit 1


Process: To make this cup, I started out with a slab. I then went on to wrap my slab around another cup, and cut/mold it onto/around that cup. Once I did that, and made sure I slipped everything together well, I moved on to smoothing out. I have found in order to really like a piece it's important to pay attention to small details like that. Once my cup was smooth, I cut out a present shaped half circle to be the top of the cup or "lid" and rolled it out with a textured rolling pin. I use a straw to get the hole in the middle. For glazing I did Mid-Fire glaze 2x smokey merlot and 2x textured turquoise.

Reflection: I actually really like the way this cup turned out, but I definitely do have some things I would do differently. I think I need to add more layers of glaze when painting with Mid-fire in order for it to reach its full potential. I also really want to come up with a solution to reach all the cracks w/ glaze because I had a really hard time glazing under the lid of this cup. Some things I think turned out really well with this cup was the overall shape and the pattern on the lid.


Process: I began making this by rolling out a slab, and cutting out a surfboard shape. I think rolled out some balls to make the stubs on the surfboard. The hardest part was definitely slipping the little stubs on because they were so small and I kept accidentally smushing them.
Reflection: I ended up scrapping this project Because I realized I didn't really have a use for it. The first year I took ceramics I just made a bunch of things as busy work, and enjoyed very few of them. This year I promised myself I would be different, so I decided to stop, and not continue with this project.


Process: I started out by rolling out my clay into three balls, each ball a little smaller than the other. I then molded all of these balls together in the shape I felt best resembled a shark. I added clay as I went, until I was happy with the body shape. I had found this method on a social media platform and it worked really well for me. All of the fins were cut out from a slab, and used a loop tool to hollow out its mouth. The longest part of this project was painted on all the dots because I tried to make them look some-what uniform. Once I was satisfied with the underglaze, I fired my piece, and went on to paint it with clear overglaze.

Reflection: I really loved the way this turned out. Anytime I used underglaze I'm nervous for the final product, and how my colors will look when clear glaze has been added to finish, but this turned out wonderful! The only think I wish I would've done differently for this piece is that I think I should've rounded out this whale sharks head a little bit to make it more realistic.
Unit 2


Process: I began making this bear by molding its head and body (rolling the clay into two balls, one bigger than the other). I then went on to add the ears to the head, and the arm and legs to the body. Once I did that I scored and slipped the head and body together. I then added the face details, and hollowed the bear out. I first painted this bear with underglaze, and then with clear over glaze.

Reflection: As far as the actual structure of this bear, I really do like it. However when it comes to the paint I really wish I would've taken longer and paid more attention to detail. I also can't help but kind of wish I would've added in some detailing to give the bear some hair so it would further resemble a little teddy bear. Even with those things though, I am very proud of this project. I took me a pretty long time, and I like how it turned out.


Process: I started this bowl with zero direction, and decided to kind of just let my creativity take a hold of the project. I used a slab to put inside a wooden bowl, and used it as my own mold. At first I wanted it to just be a little glazing project, but then I found a little carrot mold. I used clay to put inside the mold, and then slipped and scored the carrot onto my bowl. I actually loved the way that looked, and used it as my inso for the whole bowl. I underglazed the bowl with only 2x of white so you would be able to see some of the texture by the last firing, and painted on some details.
Reflection: Although I do think this turned out cute, I wish I would've sent more time on it. The top of the bowl looks messy and uneven, which really annoys me. I do like how the underglaze turned out, and the fact that you can see some of the texture under the white just like I intended. I definitely think this project made me realize it's not all about getting it done, but also being able to imagine and see what you need to correct before you get there.
Unit 3
Planning: I went into this project knowing I wanted to work on glazing. I have noticed with a lot of my pieces that I'll like the structure, but regret how I painted. I figured this would be some good practice, and something fun to do.
Process: I made this bowl by rolling out a slab and using the bowl as a mold. I had some issues with cracking, and it took super long to get this piece to dry enough to come out. I liked this method, and spent more time getting smooth edges as opposed to my carrot bowl. I think that using my sponge a lot with less water than I did the last time was goos. Once this did dry it came out super easy and I was excited to glaze it
Update/Reflection: This piece had disappeared off of the shelf I put it on the day I got it out the kiln (the next class) so I am guessing someone had mistaken it for theirs and taken it to glaze. I'll do a reflection on my building process though because I did plan on it being one of my projects. I really like the slab/mold method, however I think having to wait for it to dry is super inconvenient. I had heard that you can put cornstarch so you don't have to wait so long, and I'll think I'll try that next time.


Process: I started making this cup by rolling out a slab, and molding it around a talenti jar. I then made the eyes by rolling out to small balls and flattening them. I made the little beak by getting a small piece of clay, and using my hands to get it into the desired shape. I made the feet by cutting them out from a slab, and once I had all pf the face details on, I smoothed it all out the best I could. I used underglaze on the outside of this cup, and tried to make it look like a mallard duck.

Waiting on kiln/reflection: This piece is still waiting to get in the kiln/come out, so I'll do a reflection on the building process and the painting process. I made this cup for my dad because he goes duck hunting frequently and likes put things we made on his desk. I figured he could put all of his pens in it. Building this was fun, but a long process. Getting to form my slab against the cup took me awhile because I wanted it to be smooth. The top of my cup was still uneven and bumpy, but I decided perfection wasn't the goal. I still really like this piece and all of its little imperfections because I know my dad will love it. I enjoyed painting it too! Im learning to slowly grow to like to paint things.


Process: I didn't use an inso pic for this little alligator because I had a goal to create one thing without using any kind of pictures, and I landed on this guy. I started out with just a little block of clay, and used my hands to mold it into the bulk of the body. I then molded a piece of clay into the tail, and some other pieces of clay into the feet. Once I scored and slipped all of that on I had to figure out how to make the little ridges on the alligators back. I ended o deciding to make a bunch of tiny balls, and place them onto the alligators back, while using a paint brush dipped in water to get them to fully mold on.
Once it came out of its first firing I used the overglaze Irish luck (05/06) for the body, and overglaze Tuxedo (05/06) for the eyes.

Reflection: I love this piece!!! I actually love the color of my glaze, and the only thing I wish I would've done differently is make an indent for the eyes. I really like the fact I was able to make this piece even as that is something I have struggled with in the past. Any time I made a piece with legs it would always be a little wonky, and not stand up quite right. I ended up giving this to my brother because I thought it was cute enough to be a gift and he really enjoyed it so thats another bonus.
Final
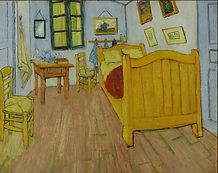
Vincent Van Gogh was born in Zundert, Netherlands, to a Protestant minister in 1853. Within his life had come to be many things. He was a teacher, a preacher, and an art dealer before becoming an artist at 27. A key part of his life and career was his relationship with his brother Theo, who supported him through everything. He had numerous mental struggles, like depression, bipolar personality disorder, and so on. Ultimately, his mental health played the biggest hand in his suicide in 1890.
Van Gogh's brother Theo not only heavily impacted his career in art, but also this painting itself. This painting has three different versions, all of which meant to depict his bedroom in the "Yellow House" in Arles. His brother had financially supported Van Gogh, so he could focus solely on his art. This place, meant to feed into art born from brotherly love ultimately led to distance being put in between Van Gogh and his brother Theo. During Van Gogh's time in Arles he had cut off his own ear, and his brother Theo rushed him to the hospital.
Theo began to get a better understanding of Vincent Van Gogh's mental health issues, and couldn't handle it. Van Gogh ended up leaving Arles in 1889, and the relationship between him and his brother was fractured.
Vincent van Gogh
'Bedroom in Arles' 1888
Van Gogh Museum, Amsterdam

I started this project by rolling out a slab, and then using a ruler to get my walls/floors to match up. I scored and slipped each square I had cut out together starting with the floor, and then going onto the walls.
Once I was done with that, I began looking to the painting for details I could get scored and slipped on.

I had used the picture as a guide for all the little pieces and things I had to add to the room. Everything I had made for this piece had been from a slab, and cutting out shapes. The little vase on top of the desk was the only thing I had molded from a tiny piece of clay.

Reflection: I really liked making this, and constructing a little room. One of the main reasons I chose to do this painting for my project was because I was interested in doing something with rooms. There are a few small details missing from my piece that I wish I just would've added because it wouldn't have set me behind like I thought it would have.
I still wish I had overgrazed this piece just because I was looking for something a little more blended.
I had also had the top of the chair break off while it was bone dry and tried my best to re-attach it by re-hydrating it.
In all I enjoyed making this piece and finding out more abut my artist and this painting.
I had originally planned to overglaze my piece but I had run out of time and had to underglaze. If you look at the floors, you can see we had ran out of brown underglaze, and I tried to mix some colors together to make brown.
I definitely didn't do a perfect job when painting this, but I tried to use the painting as a guide for everything I did.
Unit 4


Planning/process: I found a little template on a social media platform, and loosely followed it to make this boot. It was made from a slab. I cut out individual pieces and then molded them together to shape the boot. I had also used tools, specifically wooden ones to smooth it all out. I had initially made this with the intent to put matches in it, but I think I made the upper-boot too small.

Glazing: I went on to glazing this piece with overglaze. I glazed it with ruby red, cotton tail, and blue yonder. I tried to imitate the look of a western boot the best I could. This took me a pretty long time, and I layered each of the paints over each other. I had thought this would turn out cute once I had stopped painting. It was a long process, and I doubted myself a lot throughout it.
Conclusion/Reflection: I really really regret how I glazed this piece. I think I should've gone with underglaze and really payed attention to how much I was painting. The way this turned out was sad because I did/still do think it is a super cute Idea. I hope that I'll have time to maybe re-try this and make it bigger with a better glaze job.
Monster


planning/process: This monster was SO fun to make! I loved constructing this little guy based off of the drawing. I started out with a block of clay, and molded it into a half circle. I then made s slab of clay, and cut out triangles for the teeth. I had rolled little pieces of clay into balls for the eyes, and added a thin flat layer for the eyelids. I tried my best to really match it up to the drawing.
I also hollowed it out.


Glazing: As I started glazing this (w/ ruby red and tuxedo black) I accidentally knocked it on the table... and broke it. I was really sad but the show must go on because I needed to get this thing done. I referred back to the kids drawing a lot when painting this. I tried to give it some water color effect by splattering black on the red in some areas. I had a lot of fun with the colors, and trying to imagine how this piece would turn out as I painted it.

Finished product/reflection: If I'm being honest, I wish this would've turned out better. I spent a really long time making this, and expected to like it more. I needed to add more glaze, and am still really sad about the little broken antenna. I forgot to glaze the bottom of this piece, and I genuinely am in disbelief over it. I thought about how I couldn't forget multiple times while glazing it. I do like how close and accurate it is to the drawing structure wise.


Alebrije
Planning/Process/Reflection: Im including this even though it never made it in the kiln. I have been really wanting to make a chip and dip bowl similar to this one, and started with trying to hand build from a slab. Even though this was a little mini version, I was still so excited to see how it would turn out!! However it sadly never made it to the kiln. Im guessing it cracked (which I have been having a ton of issues with lately). I am hoping I will be able to remake this piece soon, as a bigger version, and see success.

The starfish photo I deleted b/c I thought it was a repeat photo.

Planning/Process: My starfish has broken/cracked 3 times. One of the times I was out sick for a week, and didn't know until a week later when it didn't come out the kiln. I am on my 4th and hopefully final starfish. This starfish has been a pain to keep from breaking, but has an easy building process. I always start with a block of clay. I make a circle/round block of clay the center, and roll out five logs to become the legs of the starfish. I score and slip each leg to the starfish, and manipulate them in a manner I like. For this last starfish I also put a little paint container to make the center appear raised as if it were on a rock.

Waiting to be fired.....
Painting: I plan on doing a color combo of bright pink, yellow, orange, and blue/purple. I want the starfish to really stand out, and look like it is glowing. I hope to be able to use some paper on the starfish and glue it down in certain areas to add texture and some pop. I am really hoping this starfish makes it to and out of the kiln by the beginning of the week the Alebrije is due so I can get it fully done